Last Updated on February 7, 2026
Is it time to move to the cloud?
Have you noticed how important emails are for conversions and in return, more revenue? You use them to spread awareness of your brand, send out information on promotions to your customers, or maintain a business relationship for the sake of potential collaborations.
That’s why personalized emails are crucial – it’s proof that you take your business seriously. Plus, it goes a long way towards building a good reputation with your audience.
One of the best ways to set up your hosted personalized email is through Microsoft Office 365. With Office 365 for Business. You also get to taste many features that can give a boost to your overall productivity. In this article, we’re going to show you how to set up an email on Office 365.
Why Microsoft Office 365?
You probably have heard of Microsoft Office – it’s an office suite containing lots of useful productivity tools at its arsenal created by Microsoft. One thing that makes the office tool stand out is the fact that they keep releasing a new version every few years. Meaning, you can rely on Microsoft Office due to their effort in keeping up with new demands and standards.
So, what exactly is Microsoft Office 365? Well, it’s a subscription program provided by Microsoft Office. Think of it as the usual Office applications you’re familiar with – except for the part where you also get to access a bunch of additional benefits such as real-time collaboration, online sync between multiple devices, and de-cluttering your emails.
Office 365 has various plans to offer – the only one relevant right now is Office 365 for Business. It allows you access to the admin center where you get to do many things including setting up personalized emails for your business.
Before You Start
If you’re interested in Office 365 to host your personalized email, there are things that you should prepare first.
Well, there can be a few hoops to jump through, but we’ll make sure to cover every step that you can easily follow. Here’s what you need to have first.
- Office 365 for Business Premium subscription. if you don’t have one, we’ll explain how to sign up for the trial program.
- A domain name. It’s the address that comprises of your brand name and a TLD (top-level domain) such as .com or .org. Coming up with a unique and catchy domain name can go a long way to building trust and gaining followers. One way to do this easily is by using a domain name generator – take a look at this article for a list of best domain name generators out there.
- Access to your domain’s control panel. Go to your domain registrar and log in to your account.
Already got them all? Let’s get started, then!
Step 1: Setting Up A Subscription
First things first, let’s go over the subscription process. Office 365 Business Premium is the only plan that will fulfill our needs. If you’re not willing to invest at the moment, you can try the product first by signing up for a trial account.
Upon clicking the link above, scroll down a bit and you’ll see the option to try it for 30 days.
There are three Office 365 Business plans you can choose, each comes with different size for features.
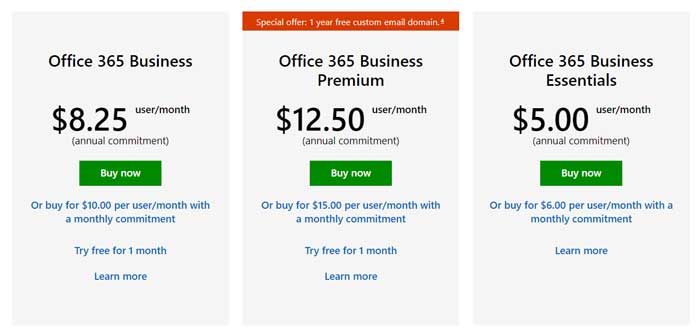
Ignore the other two and choose Office 365 Business Premium as it’s the only plan that allows you to use a custom email domain – click on Try free for 1 month if you wish to go trial first, or click Buy Now if you want to purchase it right away.
Regardless, you’re still required to fill in the necessary details including the credit card information and other credentials such as your identity, details of your business, etc.
In this part, you’ll be able to create your business identity – including the domain name of your business. You’ll be given a subdomain (yourbusiness.onmicrosoft.com) or you can add a custom domain right away. If you decide to change it later, you can always add a domain name through the admin center.
Now, finish your registration and sign in to your account (with the email of the subdomain you created earlier).
Step 2: Set Up Your Email
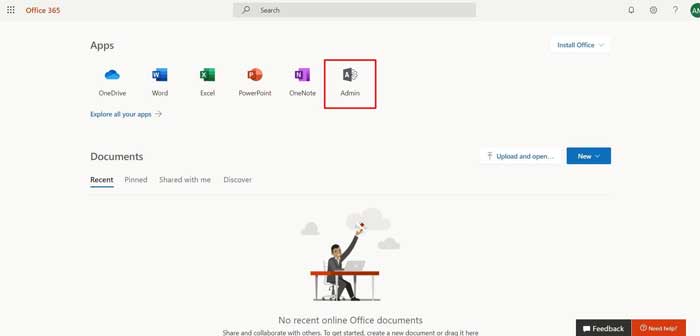
Once you finish the registration, you’ll be directed to your homepage where you get to install the Office 365 apps.
Now, if you want to set up your email right away, go to your admin center by clicking the admin logo as shown below.
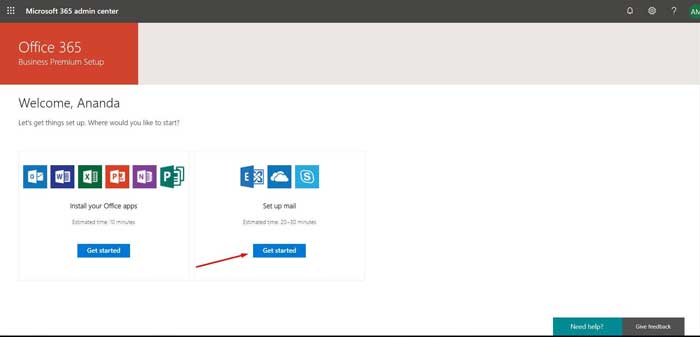
In the admin center, click on Go to setup. You’ll be given two choices: install your Office apps or set up your email. Choose the second option by clicking Get started below it.
Then, you have to enter your custom domain name that you’ll use as your email. Click Next once you’re done.

The next step is the verification process. There are two methods you can use here – email verification or your domain provider/registrar.
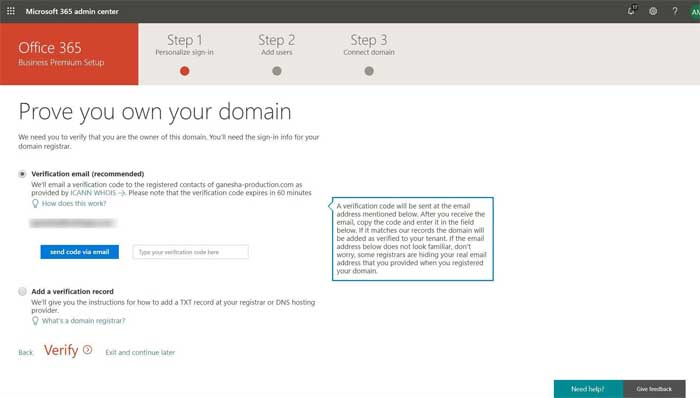
Email verification is much easier as you only need to open your inbox and copy-paste your verification code to the available box. As for which email, it’s the one that you register as the contact of your domain. They will display your email address just in case you forget which one it is.
If somehow you don’t recognize the email address they show you, or perhaps your domain comes with privacy protection measures. Don’t worry, they’ll still send the code to your real email address – just proceed normally. Click Send code via email and check your inbox.
Just in case this method doesn’t work, you’ll have to add the provided TXT records to your domain by referring to your domain’s DNS setting. It won’t affect your domain at all and once the domain is verified, you can remove the records right away.
Step 3: Add Users
If your verification process succeeds, you’ll now be able to create emails with your custom domain name.
Just type in the first name, last name, and the username for your new email address.
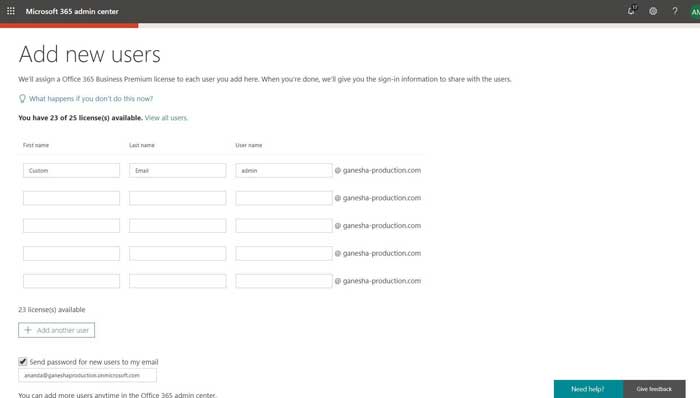
The passwords for each email will be sent to your email (the one you provided during the Office 365 registration).
In addition, you can choose to send the email credentials to alternate emails of each user for easier sharing. You can also download the information to CSV files or print it out.
In the next window, you can choose whether to migrate the messages from your current email service. Choose either option and just follow the instructions afterward.
Step 4: Connect Your Domain
The next step would be connecting your domain by setting up records on your DNS. It may seem a bit technical at first but all you have to do is just copy and paste some text.
There are two options here – changing the name servers or managing your own DNS servers. The first option is recommended since it’s a lot easier while the second option is only preferable if you have a complex DNS system (or if your DNS hosting is different from your domain registrar).
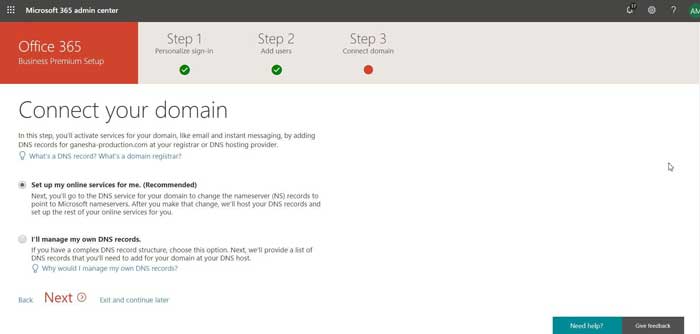
Choose either option then click Next.
In the next page, you’ll be required to select the services that you want to use – Exchange, Skype for Business, and Mobile Device Management for Office 365.
Each service requires you to set a certain type of records. For example, you need to add MX, CNAME, and TXT records for Exchange. As for Skype for Business, you need to add two SRV and two CNAME records. Don’t worry if those terms don’t make sense, you just need to follow the instructions correctly.
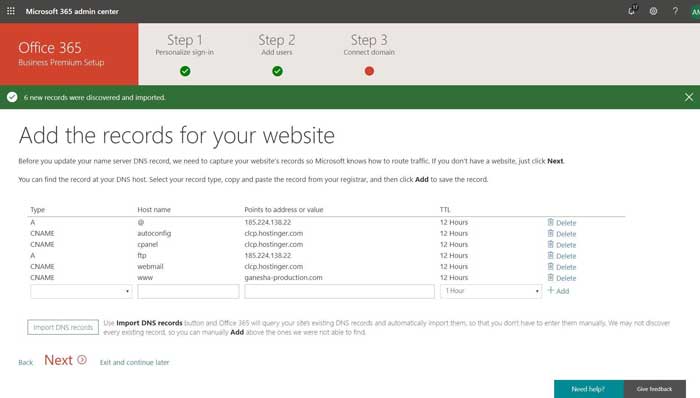
Now, Microsoft requires you to enter the existing DNS records of your website. To do this automatically, just click Import DNS Records and wait for a little while. Once the DNS records are detected, click Next.
In this page, a series of the name servers you need to add will be displayed (e.g ns1.bdm.microsoftonline.com, ns2.bdm.microsoftonline.com, etc.)
You need to copy those servers into your DNS records. So, log in to your domain registrar and find the DNS zone editor (refer to your provider’s knowledge base or support – each provider may have different navigation methods).
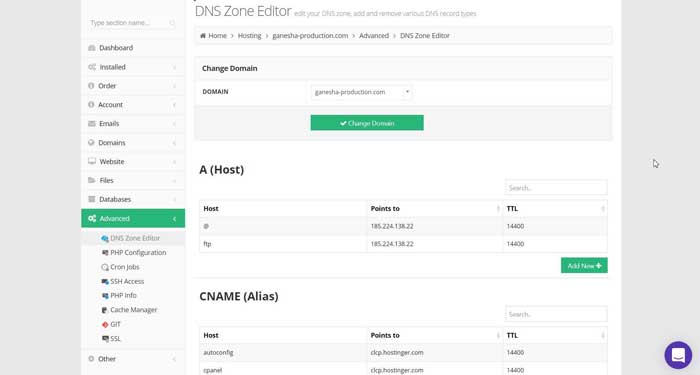
This is what your DNS zone editor will probably look like. Find a section where it says NS (Name Server) and click Add New.
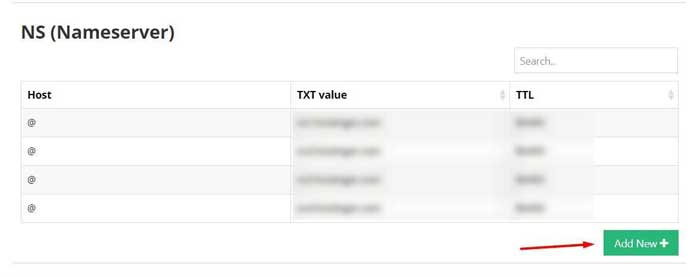
Enter the all four name servers one by one or change the already existing ones into ns1.bdm.microsoftonline.com, ns2.bdm.microsoftonline.com, etc.
However, doing this will affect the service currently affiliated with your domain (website). If your domain is already used as a web address, then you have to enter the nameservers in the following steps.
Navigate to your admin center, then go to Setup -> Domain. Then, select your domain and click Custom Records -> New custom record. Enter the corresponding nameservers above using TXT value, and you’re all set.
Once you’re done, continue where you left off and click Verify. If you succeed, you’ll see the page below.
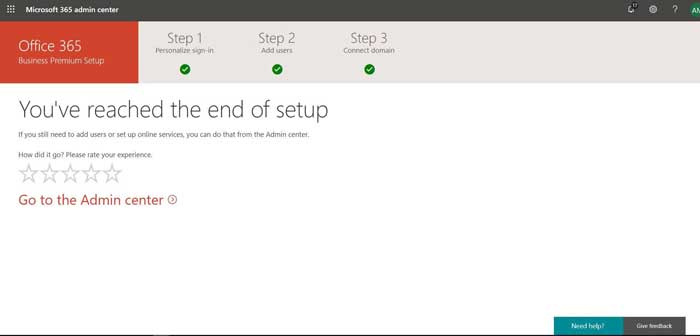
Congratulations! Now all of the emails you created earlier using your personalized domain are ready to use.
Conclusion
Now that you have personalized email names under your brand, you can start using it to send messages to your potential customers or other recipients to show that you mean business!
You might want to start off with a mailing list, though!
Sure, the journey may be long and complicated but we hope our guide here can help you go through all the process.