Last Updated on March 27, 2026
Microsoft Outlook uses what is called a PST file or Personal Folders File to store your email, contacts and calendar data etc. in one central location. Each Outlook user will have their own PST file for storing their email data. If this file becomes corrupt then you will not be able to access your email and other information stored in your PST files.
If you are a Microsoft Outlook user you may want to consider backing up your e-mail and contacts. The best way to do this is to export all your information into a PST file. This Outlook PST file will contain your e-mail including inbox, outbox, sent, trash and other folders. It will also include your contacts and calendar information. After you back up your Outlook you should keep this backup on a CD or other location separate from your computer in case of a computer crash that could involve data loss.
There are only a few simple steps needed to export your PST file. The following example applies to modern Outlook desktop builds, though legacy versions may vary slightly. Follow these instructions to secure your profile records.
Step-by-Step: Exporting Outlook Data to a PST File
1. Access the Export Menu
On the File tab, click Open & Export (or Import and Export for older versions). This menu contains the primary file transfer utilities inside the Outlook desktop client. Selecting this action prepares the application to generate a standalone data backup file.
2. Launch the Import and Export Wizard
Click Import/Export and then select Export to a file, then click Next. This launches the structured wizard that guides you through the file generation process. The screen gives you choices on file formats and folder selections.
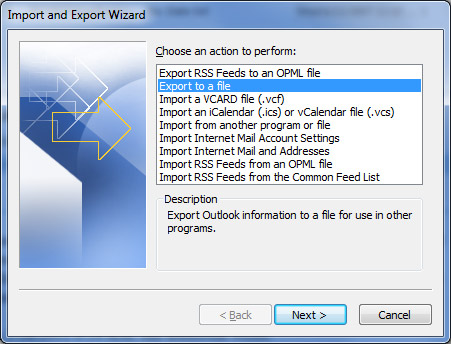
3. Choose the Personal Folder File Type
Click Personal Folder File (.pst) or Outlook Data File (.pst) from the list, and then click Next. Selecting this target format preserves your existing folder hierarchy during extraction. It maintains full compatibility for restoring your messages, contacts, and calendar schedules later.

4. Select Target Folders and Subfolders
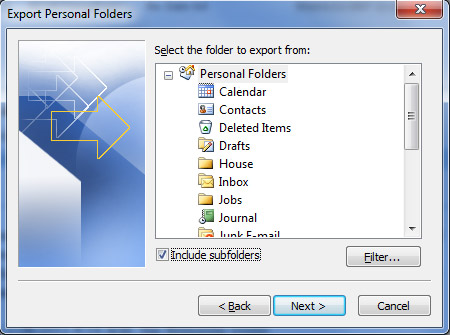
Where it says Select the folder to export from, pick the top folder that says Personal Folders and check the box that says Include subfolders. This way you will export everything below your main folder. You can backup specific folders as well if you don’t want to backup everything. Then click on Next.
5. Define Save Location and Duplicate Settings
Browse to where you want your PST file to be saved, such as a local desktop directory or external storage device. In this step you will also name your file or use the default backup.pst filename. You will then be presented with 3 choices in which you will need to choose one.
Replace duplicates with items imported overwrites existing data with the information in the file being exported. This choice updates existing backup files with the most current data available.
Allow duplicates to be created ensures existing data will not be overwritten, and duplicate information will be added to the backup file. This setting retains multiple copies of items across sequential backups.
Do not import duplicate items keeps existing data intact, and duplicate information in the file will not be copied to the backup file. Selecting this option avoids filling your storage space with identical items.

6. Finish Export and Configure Password Options
Click on Finish to complete the setup process. You will then be prompted to assign a password to your file and have it compressed. These are optional choices that offer added file security and reduced storage footprint.
Managing and Restoring PST Backup Files
1. Maintain Safe Storage for Backup Files
Now you will have a current backup of all your Outlook information in case it needs to be restored at a later date. Keep in mind that it will only be current up to the date that you performed the backup. You can do this process as often as you like and overwrite your backup or make additional backups. You also need to make sure to keep your backup in a safe place in case something happens to your computer and you need to reinstall Outlook and import your PST file.
2. Restore Emails Back into Outlook
To import the file you basically do the same thing but backwards. Go to Import and Export and pick Import from another program or file and then choose Personal folder file (PST) and follow the prompts to restore your data. This process reinstates all saved mailbox folders back into your active profile.