Last Updated on July 22, 2026
Whether you are managing a corporate project team, coaching a local sports league, or just organizing a family reunion, typing out the same twenty email addresses over and over is incredibly tedious. Worse, doing it manually almost guarantees you will eventually forget to include someone important.
Instead of rebuilding your recipient list from scratch every time you draft a message, you can set up a distribution list. In modern versions of Outlook, this feature is officially called a Contact Group.
Creating a Contact Group bundles a specific set of email addresses under one single name. When you want to message the team, you simply type the name of the group, and Outlook automatically delivers the email to everyone on the roster. Here is exactly how to set one up, how to use it, and how to keep your recipients’ email addresses private.
Step-by-Step: Creating Your Contact Group
1. Open Your Contacts Navigation
Building your first group only takes a few seconds. Open your Outlook desktop application to get started. Look at the navigation bar on the left side of your screen and click the People icon (it looks like two small silhouettes) to open your contacts.
2. Create a New Contact Group Workspace
On the Home ribbon at the top of the screen, click New Contact Group. This action launches a separate window dedicated to building your custom list. Make sure you are on the main tab to find this option easily.
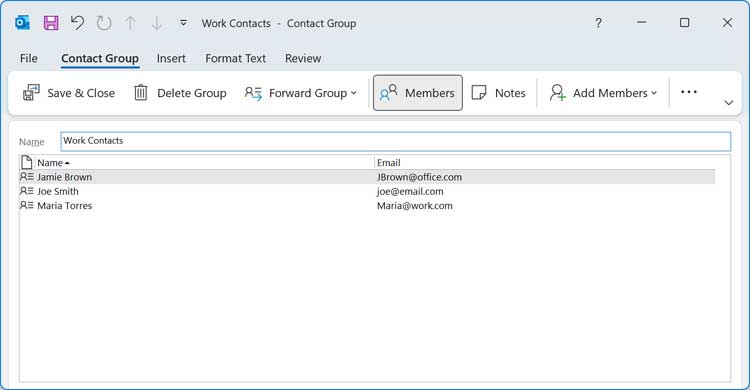
3. Assign a Title to Your Group
A new window will pop up. At the very top, type a clear, recognizable name into the Name box, such as “Marketing Team” or “Soccer Parents.” Picking an obvious name makes it simple to search for the group later when sending messages.
4. Select the Add Members Menu
Click the Add Members button located on the top ribbon. This opens your dropdown menu options for importing contacts. You can source your group entries from several places depending on your current setup.
5. Choose and Save Your List Entries
A dropdown menu will appear offering you three choices. You can select people straight from your Outlook Contacts, pull them from your company’s Global Address Book, or choose New E-mail Contact to manually type in the email address of someone outside your organization. Continue adding people until your roster is complete. Once you are satisfied, click the Save & Close button in the top left corner. Your new distribution list is now active and ready to use. You can then click on the Select Add Members button to bring up your address book and add names to your distribution list. You can add addresses that are not in your address book by clicking the Add New Email Contact and manually typing them in.
How to Send an Email to Your Group
1. Address Your Message Roster
Sending a message to your new group is just like emailing a single person. Open a new email draft in your inbox view. Click the To button to browse your contacts and select your newly created group, or simply start typing the name of the group directly into the recipient line. Outlook will auto-complete the name just as it would for a regular contact.

Updating and Managing Your List
1. Access Your Saved Contact Roster
Teams change, and you will eventually need to update your roster. You do not need to delete the group and start over if someone leaves the project. Simply navigate back to your People tab and double-click your saved Contact Group. This will reopen the management window.
2. Modify Your Existing Roster Members
Highlight the name of the person who is leaving and click Remove Member on the top ribbon. You can also use the Add Members button to bring new people onto the list. Hit Save & Close, and your future emails will immediately reflect the updated roster.
The Golden Rule: Use the BCC Field
1. Protect Recipient Address Privacy
Before you hit send on your next massive group email, there is a crucial etiquette rule you need to follow regarding privacy. If you put your distribution list in the standard To or CC fields, every single person who receives the email will be able to see the names and email addresses of everyone else in the group. In a professional setting or a large public group, exposing everyone’s private email address is a major privacy violation. Plus, if someone clicks “Reply All,” it will blast their response to dozens of people who likely do not want to read it.
2. Apply the Blind Carbon Copy Setting
To prevent this, always put your Contact Group in the BCC (Blind Carbon Copy) field. When you use BCC, each recipient will receive the email normally, but they will not be able to see who else is on the list. If you do not see the BCC box when composing an email in Outlook, click the Options tab at the top of your draft window and click the BCC button to reveal it.