Last Updated on April 27, 2026
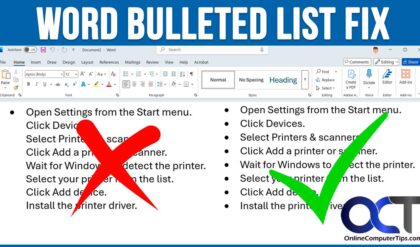
Every time you open a brand new document in Microsoft Word, you are greeted by the exact same default font settings. For over 15 years, that standard font was Calibri. However, Microsoft recently rolled out a major update that replaced Calibri with a new default font called Aptos.
If you are not a fan of the new Aptos look, or if your workplace strictly requires all documents to be written in Arial or Times New Roman, changing it manually every single time you start a new project is incredibly frustrating. You also have the option to download new fonts on demand right from within Word.
Fortunately, you do not have to settle for Microsoft’s default choices. You can easily reprogram Word so that your favorite font, size, and spacing are locked in and ready to go the second you open the app. Here is the absolute best way to change your default font permanently.
Step 1: Open the Font Dialog Box
While you can easily change fonts using the dropdown menu on the main ribbon, those changes will only apply to the specific document you are currently typing in. To make the change stick forever, we have to go deeper into the settings.
- Open Microsoft Word and create a new, blank document.
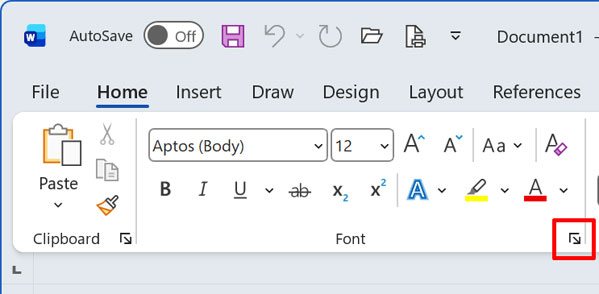
- Make sure you are on the Home tab at the top of your screen.
- Look at the Font group on the ribbon. In the bottom-right corner of that group, click the tiny diagonal arrow. This is the Font Dialog Box Launcher. (You can also bypass this by simply pressing Ctrl + D on your Windows keyboard).
Step 2: Set Your New Default
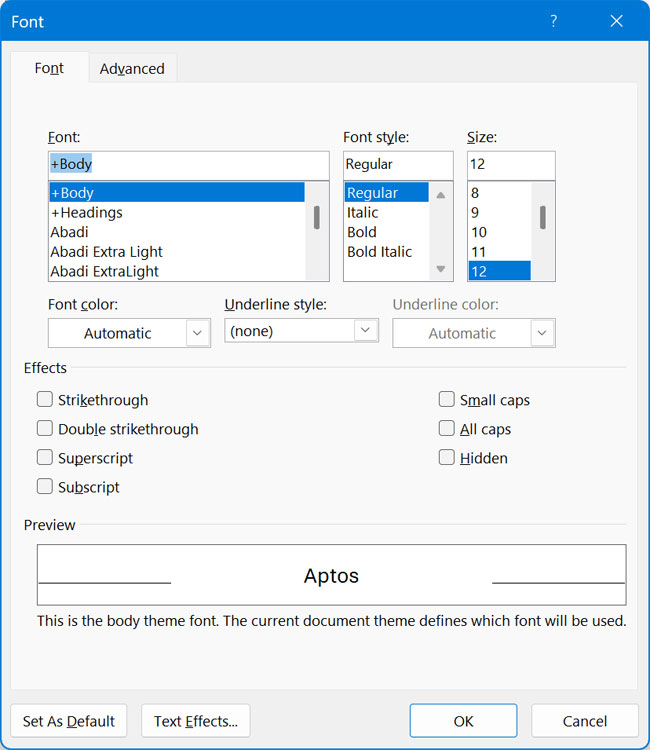
A large Font settings window will pop up on your screen. This is where you will build your permanent template.
- Select the exact Font you want to use going forward (such as Arial or Calibri).
- Select your preferred Font style (Regular) and Size (typically 11 or 12).
- Do not hit OK yet! Look at the bottom-left corner of the window and click the Set As Default button.
- A confirmation box will appear asking how you want to apply these changes.
- Select the bubble that says All documents based on the Normal template and click OK.
You can now close out of Word. The next time you open a brand new document, your perfectly customized font will be waiting for you!
Troubleshooting: Why Won’t My Default Font Stay Changed?
If you followed the steps above, but Microsoft Word stubbornly reverts to Aptos or Calibri after you restart your computer, your master template is locked.
Whenever you create a new document, Word uses a hidden master blueprint file called the Normal.dotm template. Sometimes, strict corporate IT security policies or third-party add-ins (like Adobe Acrobat or Grammarly) will actively block Word from saving any changes to this master file.
If the “Set As Default” button is failing you, you can manually force the blueprint to update by opening the master file directly.
How to manually update the Normal.dotm file:
- Close Microsoft Word completely.
- Press the Windows Key + R to open the Run dialog box.
- Type %appdata%\Microsoft\Templates into the box and press Enter.
- A File Explorer window will open. Look for the file named Normal.dotm or simply Normal.
- Right-click that file and select Open. (Do not just double-click it, as that will simply create a new blank document. You must right-click and specifically choose Open).
- You are now inside the master blueprint. Perform the Font Dialog steps we outlined in Step 1 and Step 2 above.
- Save the document and close Word.
Because you opened the master file directly, your new default font is now permanently hard-coded into the software!