Last Updated on March 27, 2026
When Microsoft decided to completely revamp the way their Office suite looked it was met with mixed reviews. The new Ribbon interface is supposed to make things easier to find and do once you get used to it. That is if you can ever get used to it.
For many users, the biggest challenge wasn’t the new features themselves, but the shift in how familiar tasks were accessed. Actions that once took a few quick clicks suddenly required exploring new tabs and layouts, which disrupted established workflows. This adjustment period led to frustration for users who simply wanted to get their work done without relearning the interface from scratch.
Microsoft Word 2007 and up may differ quite a bit from older versions of Word but many of the options are the same. The options just may look a little different and you may have to look around to find what you need. To get to the Word options simply click on the Office button which is the round button on the top left of the window and then click on the Word Options button. Or for Word 2010 and up click on the File tab and then on Options. Keep in mind the help layout may vary a little between versions.
Although the layout may look different, the core functionality of Word remains largely the same across versions. Understanding where these options are now located helps reduce confusion and makes the newer versions easier to navigate. Once users become familiar with the updated menus and settings, tasks that initially felt hidden or difficult often become just as straightforward as they were in earlier versions.
The first section of the options is for the most popular options such as setting up screen tips and using Full Screen Reading View. You can also enter your personal information into Word and choose other languages to use.

The Display options allow you to change things such as how the page will appear on the screen, whether or not formatting marks are shown and what shows up on your document when you print it.

Proofing options let you change things such as your AutoCorrect Options which is what corrects errors as you type and also is what underlines spelling errors etc. If you don’t like Word telling you that you are doing something wrong you can change these options here and also uncheck any of the default correction options.

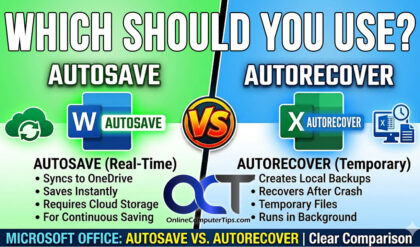
The Save options section is where you can choose the default type of file to save your documents as such as docx, Word 2003, RTF, HTML and so on. Word has an auto recover feature that will save your document and allow you to recover in case of a system crash. You can turn this option off or on and change the recovery directory options here.

In the Advanced options section you can further customize Word by changing things such as dragging and dropping text, your default paragraph type and copy and paste options. The default options should be fine for most users.

The Customize section is covered in more detail here.

Add-Ins is where you can check to see what type of add-ins you have installed such as Acrobat for making PDF files. Some add-ins will cause problems with Word or cause it to not even open. This is where you would check for problems and disabled add-ins etc.

The Trust Center contains privacy and security information and is more informational than anything.
Resources allow you to check for updates and perform diagnostics if you are having problems with Word. You can also activate your copy of Word or go directly to the Office Online website from here.
Once you get your copy of Word configured the way you like it, you should have no problem getting the most out of your software.