Last Updated on March 26, 2026
Microsoft word allows you to place clipart and photographs into your documents to add extra touches to your document or to help get your point across. Images placed into Word documents are usually treated like text when it comes how they are placed in the document.
You may have noticed that when you insert a picture into Microsoft Word that it stays in line with the text and you can’t drag it to where you want it to be. Then as you edit your text, the image will move along with it which can place it in a location where you do not want it to be. This is fine if you want the picture to act like text and move around with the text in your document but if you want to move the picture around freely then this is easy to change.
By adjusting how an image interacts with surrounding text, you gain far more control over the layout and overall appearance of your document. Word offers several wrapping styles that determine whether text flows around an image, overlaps it, or ignores it entirely, and choosing the right option can dramatically improve readability and design. Understanding these layout behaviors is especially useful when working with newsletters, reports, or visually rich documents where precise image placement helps guide the reader’s attention instead of disrupting the text flow.

1. Highlight the Target Image
To do this you need to change the text wrapping layout of the picture to either behind the text or in front of the text. This option can be changed in the Layout options for images within Word. Once you have the picture inserted into your document simply click on the image to highlight it. You will see small sizing handles appear on the corners and edges of the photograph.
2. Access the Layout Options Menu
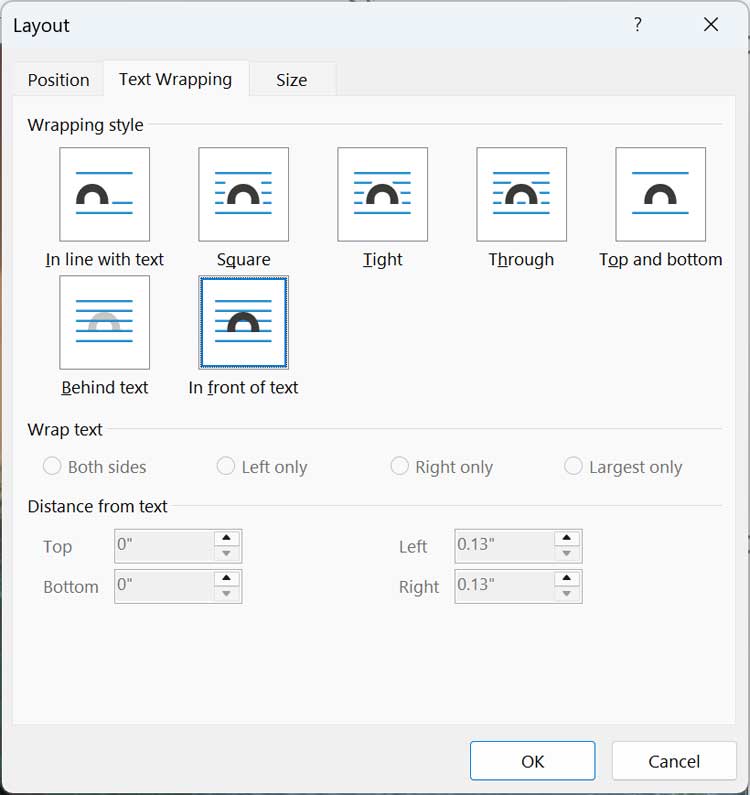
Once the image is actively selected, you can change the text wrapping options. You can right click the image to choose an option directly from the context menu. You can also select Wrap Text > More Layout Options to open the advanced configuration window.
3. Use the Picture Format Ribbon
You can also go to the Picture Format tab in the main application ribbon at the very top of your screen. Click on the drop down arrow under Position and then click on More Layout Options. This opens the exact same configuration window as the right-click method.
4. Select the Wrapping Style
Then go to the Text Wrapping tab located in the middle of the layout window. You need to choose either Behind text or In front of text from the visual icons. These two specific settings detach the image from the text lines.
5. Understand Image Layering
If you choose behind text then your image will be positioned behind the text allowing the text to display over the image. If you choose in front of text then the image will cover the text and you wont be able to see the words underneath it. Choose the layering option that best fits your document design.
6. Freely Drag and Drop
Click OK to save your layout changes. Now you will be able to drag your picture wherever you want it to be without affecting the positioning of the text in your document. You can also resize it as well as copy and paste the image into the same document or a different document.
For additional training resources, check out our online IT training courses.
Check out our extensive IT book series.