Last Updated on March 24, 2026
Recover data from your RAID sets
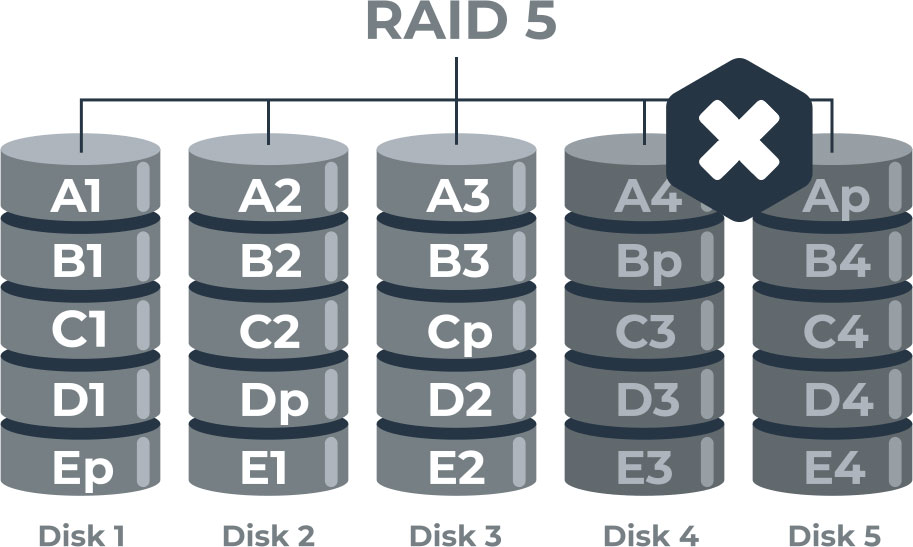
Despite the fact that data storage using RAID technology is considered to be a reliable solution, there are still quite a lot of situations when you may need to recover the data. For example, if a RAID controller failed, the array file system got corrupted or you accidentally deleted some files.
If you are faced with data loss and you are going to use DIY approach for the RAID recovery, this article will be useful for you.
1. Label the drives after removing them from a NAS device or disconnecting from a RAID controller
When you remove the drives from a NAS device or disconnect drives from a controller label them according to NAS bays or RAID ports. For example, you may put sticky notes with numbers or label the drive with a marker. Indeed, if you are going to use data recovery software, this won’t help you. However, this should be done in order to return to the original configuration and to try the other ways of data recovery. Without doing this, you will just have a bunch of useless disks.
2. Connect the drives directly
Data recovery software is designed in such a way that it requires a direct access to the disks. That’s why you should unplug the drives from the controller and connect them to the PC. You can connect them directly to the motherboard using SATA cables or use special USB-to-SATA adapters. But it’s always better to connect RAID disks directly to the PC’s motherboard. First of all, it provides the better performance of a data recovery software. Secondly, it ensures a stable work of a program. The connection via USB often causes software freezing, for example if there are bad sector on one or more disks. Furthermore, there are often defective USB-to-SATA adapters which work unstable. With faulty adapters, you won’t be able to get the cause of the problem – software bugs, or the failed drives, or something else.
3. Check the hard drives state
Before you run RAID recovery software it’s better to check the disks health using one of a disk diagnostic tools. There are quite a lot of such free tools or those that allow you to see the information about the health of the disk in their demo version. This has to be done in order to identify the physically damaged drive and to exclude it from a data recovery process (if you deal with a redundant arrays like RAID5 or RAID1) or to create a disk image file. If you include a physically damaged drive to the recovery process, it can slow down the software a lot or even worse, lead to an incorrect recovery result.
4. Use “Save State”
Since RAID arrays store large amounts of data (often terabytes of data) the recovery process can take quite a long time – sometimes several days. If for some reason the process is interrupted, for example due to a sudden power outage, you will have to start all over again. Many recovery utilities offer the “save state” function, which allows it to resume the recovery from the certain point. However, the user needs to to save the current state from time to time.
5. Disable the automatic restart
This tip is closely related to the previous one. It often happens that users wait the recovery result for many days, but the automatic restart or the installation of windows updates can interrupt the whole recovery process. In order to avoid it, go to the settings of your OS and disable the automatic updates before running RAID recovery software.
Bonus – Don’t hesitate to contact tech support
Currently there are not many DIY RAID recovery tools. While other paid RAID Recovery software cost from $70 to $250, there is one free tool – ReclaiMe Free RAID Recovery. Each software vendor wants to make the software better, to make it multipurpose and more powerful. So, if you aren’t satisfied with the recovery result don’t hesitate to contact technical support. Many data recovery companies provide remote assistance for free, when a technician connects to your PC and helps you to set the software correctly.