Last Updated on March 10, 2026
When it comes to getting a new computer you basically have two options. Buy what you see in the store and hope you are getting quality components or build your own and know exactly what you are getting. Computers are pretty cheap these days and the cheaper computer may include cheap components. Plus many computers make it difficult to upgrade or make it where you have to use their parts. It is not that difficult to build your own computer and that way you can customize it however you like.
The first step in building a computer is to decide what you are going to use it for and then buy the parts based off of that. If you plan on playing a lot of graphic intensive games or doing movie editing obviously you will need a higher end system than if you just plan on sending e-mail and browsing the internet.
Once you decide what you are going to be doing with your system then its time to go shopping. Generally you can get good deals online but for parts that you may have to return you may be better off buying them locally. That way your computer is not on hold waiting for parts. The parts that usually give you trouble and could have to be returned are the motherboard and hard drive. The other parts usually work right the first time.
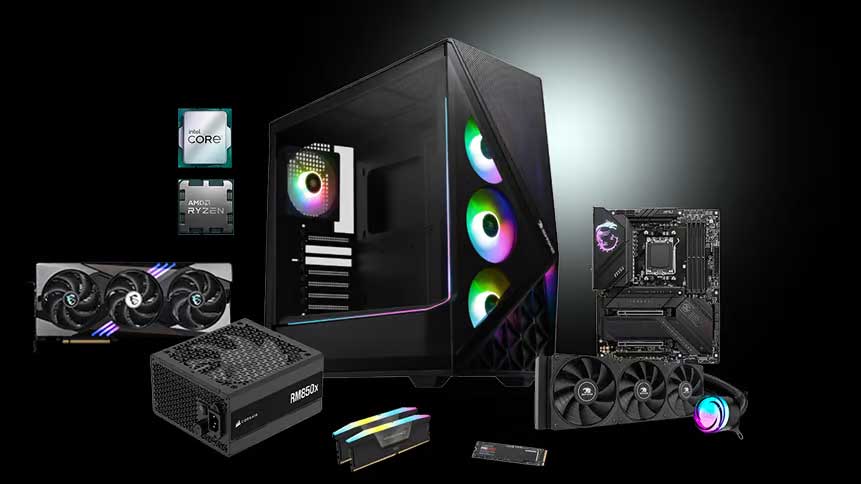
Now let’s go over the parts you need to build your computer. These are general descriptions so do your homework and find out what’s best for your system:
Processor (CPU) – This is the heart of the system. The processor will determine the overall speed of your computer and is an important decision. You have many choices for processors and will have to decide which is best for what your computer will be used for so do your research. Make sure you get a heatsink and a fan as well.
Motherboard – This is the main circuit board of the computer where everything attaches and gets tied together. You will buy the motherboard that goes along with the processor you decide on. Most likely you are going to do a single processor setup so watch out for salesmen trying to talk you into more than you need. Most will come with integrated video, sound and network ports. It will also include several USB ports and one or more video ports.
Hard Drive – The hard drive stores your operating system, programs and files. They come in a variety of sizes and types. The two main types you should consider are SATA and SSD/NVMe. SATA (Serial ATA) uses a serial connection to the motherboard. A 7200 RPM hard drive is a good speed to shoot for. There are drives that are 10,000 RPM etc but they tend to cost more. A typical size is 500GB but you may want more if you plan on installing a lot of large games or doing video editing so you can look for 1TB or more. SSD drives (or flash drives) don’t have any moving parts so they are faster than SATA drives but cost more and have less storage capacity.
RAM – RAM is the memory that applications run in when you are using your computer. Don’t confuse it with hard drive memory; it is not the same thing. If you are going to play a lot of video games or do photo or video editing you should consider getting 32GB (gigabytes) or more of RAM since it’s relatively cheap. If you are going to run Windows 110 you should have 12GB as a minimum to get the good performance (16 is better).
Video Card – The video card takes the video output from the computer and displays it on your monitor. Having a better video card will give you a better image on your monitor and speed up graphic intensive programs such as games and photo editing. Like stated above many motherboards will come with video cards built in but they are usually not up to par with standalone add in video cards. Plus they tend to use your RAM for their memory taking it away from your applications. Make sure the motherboard has the supported port for the type of video card you buy.
Sound Card – The sound card takes the sound output from the computer and plays it on your speakers. Sound cards come in many different types. Most sound cards will have a good sound to them and it will actually be the speakers that make more of a difference in the sound quality than the sound card itself. There are higher end cards that offer features like 7.1 surround sound stereo.
Network Card – This is used to connect your computer to other computers on a home or office network to share files and printers etc. For the home users it is most often used for your high speed (DSL/Cable) internet connection. The network card that is built into the motherboard should suffice for most home users.
CD\DVD ROM – This is used to install software on your computer, play music and burn CDs or DVDs. DVD drives will play CDs and DVDs but CD drives will not play DVDs. DVD burners will also burn CDs along with DVDs but CD burners will not burn DVDs.
Case/Power Supply – The case houses all the parts of your computer so make sure you get one you like and has enough room to work in and enough spaces to hold your drives. Most of the time when you buy a case it will come with a power supply. Try and get a 800W power supply just to make sure you have enough for expansion later on.
Now for the fun part, putting it all together and making it work (hopefully):
The first thing you want to do is to test your motherboard, CPU and RAM. This can be done inside or outside of the case. If you chose to do it outside of the case make sure to set the motherboard on something that won’t damage it. I suggest on top of the motherboard box and put the anti-static bag between the box and the motherboard. Install the RAM in the proper slot and install the CPU, heatsink and fan. Plug the CPU fan power supply into the motherboard. Plug the power from the power supply in the case into the motherboard. You may have an extra 4 pin power plug that will need to be plugged into the motherboard as well. If you are using an add on video card then you will need to install this too so you can see if everything it working.
Look in the manual to find the pins for the power switch. Since you have it outside of the case you can power it on without having to use the power button on the case. After you find the 2 pin connection you can “short” it by taking a flathead screwdriver and touching both pins at the same time to make a connection. Once the computer starts up take the screwdriver off the pins. If you would rather mount the motherboard in the case then you can do it that way and plug in the power switch wire to the motherboard and use the power button on the case. After you turn it on you should see your motherboards POST (power on self test) screen telling you what processor and how much RAM you have. Then you will get an error about no operating system found or no boot device found. This is ok because you do not have your operating system installed yet. If you get to this point then you are looking good. If not then something is not being recognized, not installed correctly or is no good. If everything looks good you can also fine tune your motherboard settings. Check your manual for details.
To mount the motherboard in the case carefully set it in place so it is facing the right way. You will have a plate that came with the motherboard that mounts on the inside of the case for your external connectors such as mouse and keyboard etc.


It is easier if you install the CPU, fan and heatsink on the motherboard before mounting the motherboard in the case. You will use the brass threaded screws that most likely came with your case and screw them into the bottom of the case. Then you will screw the motherboard into the top of these screws. Screw them down snug but not too tight so you do not crack the motherboard.

Now you can mount the hard drive, CDROM/DVD into the case. There will be larger drive bays for the CDROM/DVD and smaller drive bays for the hard drive. Make sure you don’t space them too far apart if they are going to be sharing the same SATA or power cable.
Hook up the power to the motherboard, hard drive, and CDROM. The CDROM and hard drive will most likely use the same type of power plug. Some SATA drives have a different power port. The floppy will have a unique smaller power plug. Hook up the SATA cables to your drives. Plug the SATA cable into port number one on the motherboard and then into the hard drive. You should be ok using any SATA port actually.
Now you can install any add on cards you have such as video, sound and network cards. Your video card will install in the slot that matches the type of card you have. It should be a PCI Express card but keep in mind that there are different versions of PCIe. The sound and network card will most likely be PCI. You should have multiple PCI slots on the motherboard.
Next you will hook up your keyboard, mouse and monitor and make sure everything still works like it did when you did the first test. Plus you should now see your hard drive and CDROM showing up in the POST screen. If everything looks good its time to install your operating system (OS). Set your computer’s boot order to boot from the CDROM first and start the computer with you OS disk in the drive. Follow the instructions and you will be up and running in no time!