
Last Updated on April 28, 2026
Boot Your Computer Into Safe Mode to Troubleshoot Issues
Windows has a special startup mode called Safe Mode that allows you to boot your computer with a minimal amount of drivers loaded and services running in order to help you diagnose a problem with your computer. For example maybe your computer freezes or crashes constantly when started normally or maybe it doesn’t even want to start up normally. There are several modes you can choose from when booting into Safe Mode and you can read about them here.
What this article covers is how to get your computer into Safe Mode so you can begin your troubleshooting process. Actually, we are going to cover different ways to get into Safe Mode in case you are having trouble trying one method or another because sometimes you need more than one possible way to get something done in Windows.
In the past, you could simply tap the F8 key during boot to access Safe Mode. However, modern computers boot too quickly for this to work reliably. In 2026, Windows 11 and Windows 10 require more deliberate steps to reach the recovery environment, but the core “Safe Mode” options, Minimal, Networking, and Command Prompt, remain the same essential tools for fixing a misbehaving PC.

But ever since Windows 8 came out, Microsoft has focused on Windows booting up as fast as possible so now it’s really difficult to interrupt the operating system boot up to get into Safe Mode. So on that note, pressing F8 usually doesn’t work unless maybe you have a slow booting computer or get lucky on the timing. But thankfully there are some other ways to get into Safe Mode even though they require a few more steps than the easy way we were used to doing it.
1 – Using the System Configuration Utility (msconfig)
The first method involves using the System Configuration utility (msconfig). This is the fastest way if your computer is currently running and you can get to the desktop. To open it, type system configuration or msconfig into the Start menu search bar and press Enter. Then go to the Boot tab and check the box that says Safe boot and make sure that the radio button for Minimal is selected unless you want to use your network/Internet connection then choose the Network option. If you want only a command prompt then choose Alternate Shell.
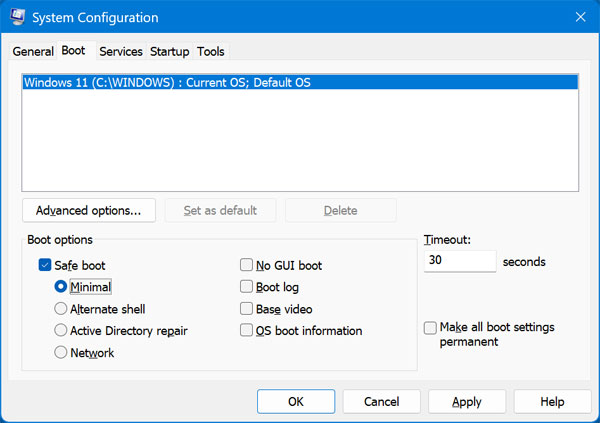
Then after you click OK it will ask you if you want to reboot your computer so if you want to get into Safe Mode right away then click on Restart otherwise click on Exit without restart but keep in mind that the next time you reboot it will go into Safe Mode. Also keep in mind that once you are done fixing your problem that you will need to go back into the System Configuration and uncheck the box for Safe boot so it doesn’t boot into Safe Mode after the next restart.
Note: Use this method with caution. If your PC uses a PIN or Microsoft Account password, Safe Mode (Minimal) might disable the internet required to verify your login. Ensure you know your local account password before using this “forced” boot method.
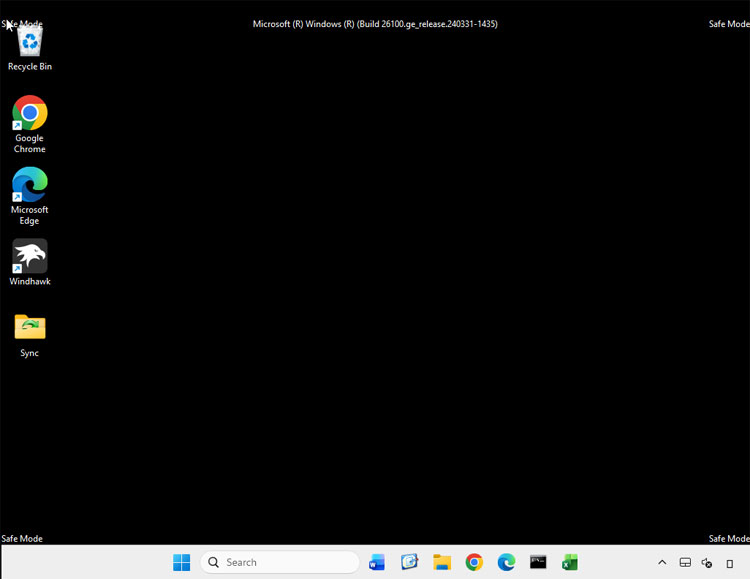
Then after logging in you should see an all black desktop with Safe Mode showing at all four corners. The resolution will also be lower because it will be using just a basic video driver. Now you can do your troubleshooting and then remember go back and uncheck the Safe boot option and reboot to boot normally assuming you have fixed the problem.
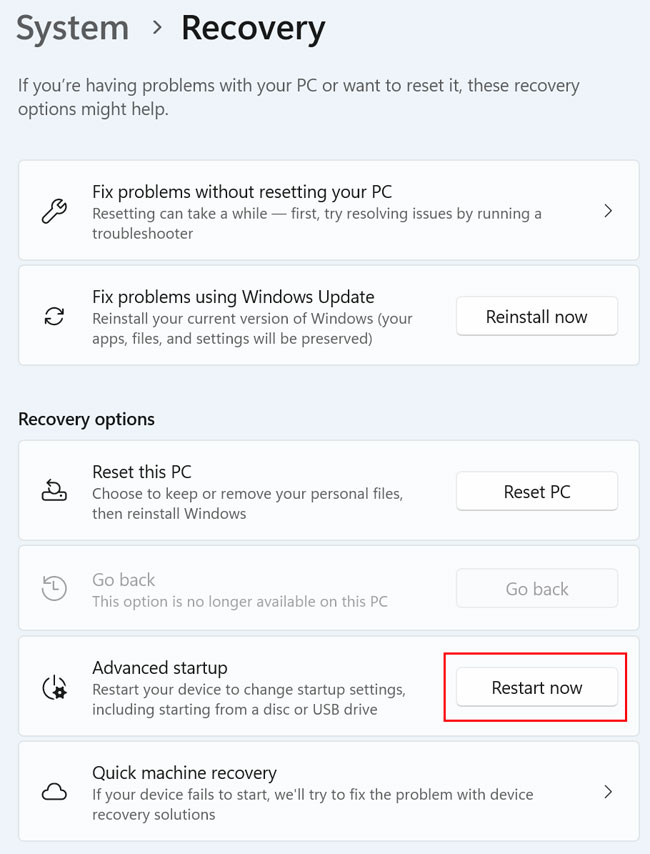
2 – Using Windows Settings
For Windows 11, open the Settings app and navigate to System > Recovery. Under “Recovery options,” find Advanced startup and click the Restart now button. If you are still using Windows 10, go to Settings > Update & Security > Recovery and look for the same “Advanced startup” section. Your computer will reboot into a blue “Choose an option” menu.
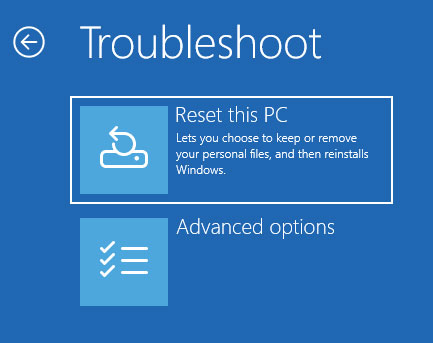
Before going further we have noticed that depending on what build of Windows you are running the options and therefore steps may vary a little so keep that in mind. So to continue, when Windows restarts you will then choose the Troubleshoot option to get to the Advanced options screen.
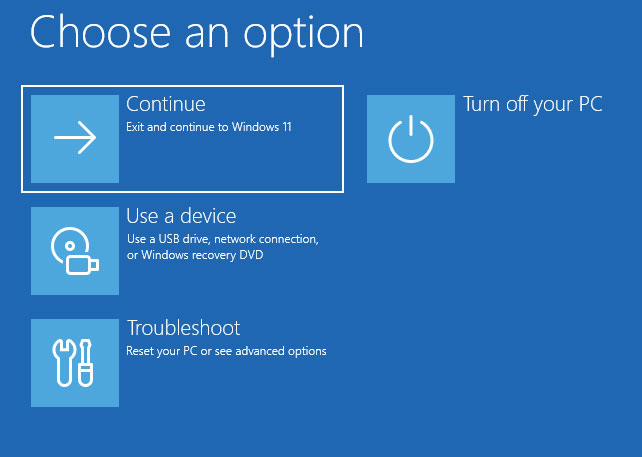
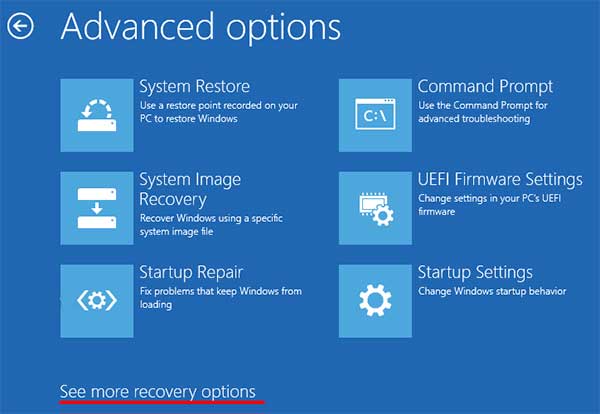
Once you reach the blue menu, the path is: Troubleshoot > Advanced options > Startup Settings. In 2026, some Windows builds might hide “Startup Settings” under a “See more recovery options” link at the bottom of the screen.
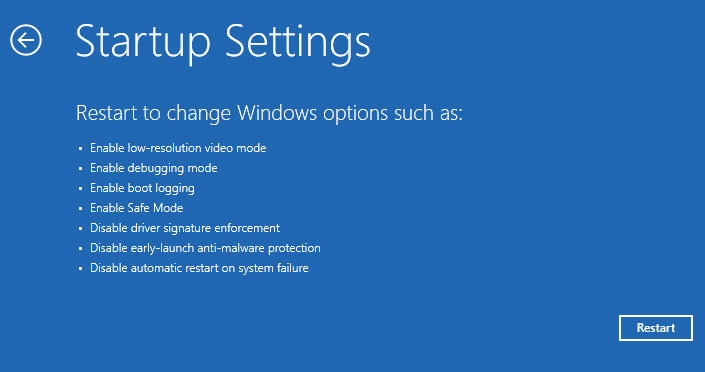
Once you find it, click the Restart button. You will then be presented with a numbered list; press 4 for standard Safe Mode or 5 for Safe Mode with Networking.
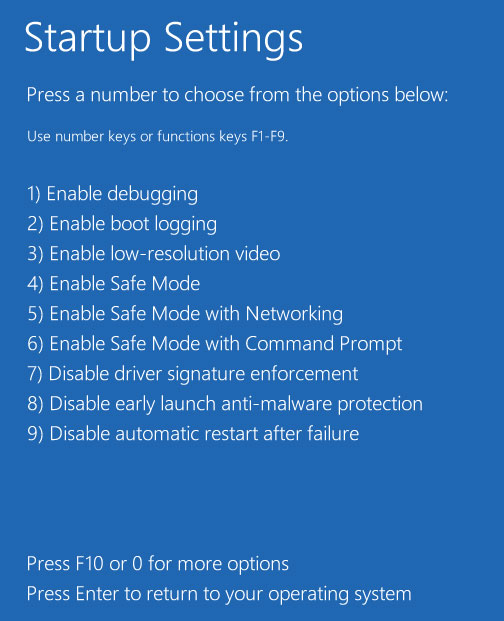
From here pick the mode of Safe Mode that you want to use such as Safe Mode with Networking by pressing the appropriate number on your keyboard and the computer will start in Safe Mode and you can start fixing your problem… hopefully.
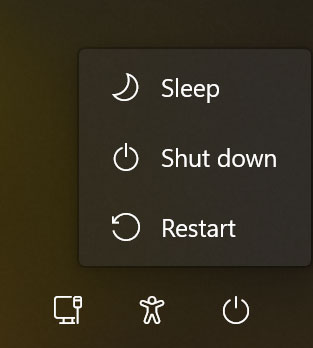
3 – Using the Shift + Restart Shortcut
This is the most reliable “pro” trick. Click the Start button, then the Power icon. Hold down the Shift key on your keyboard and click Restart. This works even if you aren’t logged in, you can do this from the bottom-right corner of the Windows login screen. It will bypass the normal boot process and take you directly to the troubleshooting menus.
If you cannot get into Windows at all, you will need a Bootable USB Drive. In 2026, DVDs are no longer standard, so keep a 16GB USB drive handy with the Windows Installation Media on it. If your computer fails to boot three times in a row, it should automatically trigger the Automatic Repair screen, allowing you to access these same Safe Mode settings without needing any external tools.
For additional training resources, check out our online IT training courses.
Check out our extensive IT book series.


