Last Updated on August 1, 2026
Computers have a set boot order that tells them which hardware device to boot off of first. Your computer follows a specific ‘Boot Order’ to determine which hardware device to start from. While most PCs are set to boot from the internal hard drive or SSD by default, you may need to prioritize a USB flash drive or optical disc when installing a new OS or running system repair tools.
You will often need to change this order to use bootable rescue toolkits, such as Hiren’s BootCD or WinPE, which allow you to repair Windows or recover data when the main operating system fails to load.
To do this you can change the boot order in your computer’s BIOS (basic input/output system). The BIOS is built in software that determines what the computer is setup to do without using information from the hard drive or operating system. For newer computers, you would boot into the UEFI settings which are more modern looking and usually allow you to use your mouse rather than just the keyboard.
Accessing the BIOS or UEFI Settings
1. Watch for the Startup Prompt
To get to your BIOS settings, start your computer and look for what it says you need to do to enter setup. You may have to press something like the delete, esc or F2 key to get into your BIOS. Not all systems are the same but your computer should tell you what key to press to enter setup when booting your computer.
2. Access UEFI from Windows 11
On modern systems with SSDs, the computer often boots too fast to catch the BIOS prompt. If you cannot enter setup using the function keys (like F2, F12, or Del), you can access it directly from Windows 10 or 11. Go to Settings > System > Recovery in the main Windows settings app.
3. Use the Advanced Startup Menu
Click Restart now next to Advanced startup. Once the computer restarts into the blue menu, go to Troubleshoot > Advanced options > UEFI Firmware Settings and click Restart. This forces the motherboard to drop directly into the system configuration menu.
Configuring the Boot Order
1. Disable Secure Boot
Many modern PCs have a feature called Secure Boot enabled by default. This is a security standard that ensures your PC boots using only software that is trusted by the manufacturer. If you are trying to boot a legacy tool or certain Linux distributions and the USB drive isn’t appearing in the list, you may need to temporarily disable Secure Boot in the BIOS ‘Security’ or ‘Boot’ tab.
2. Locate the Boot Section
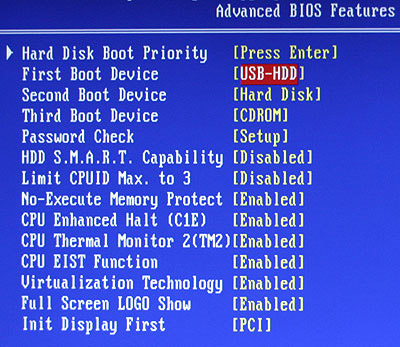
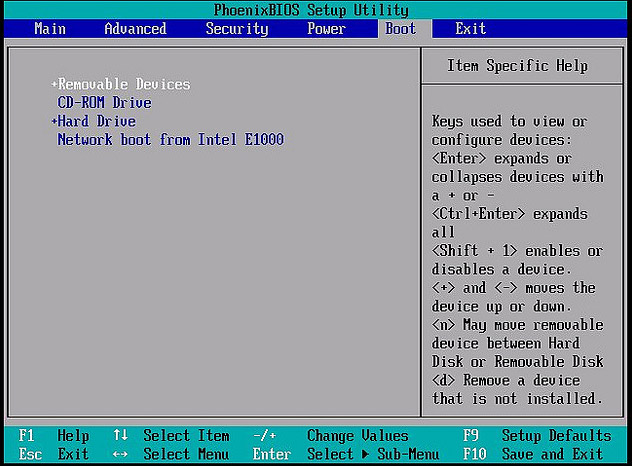
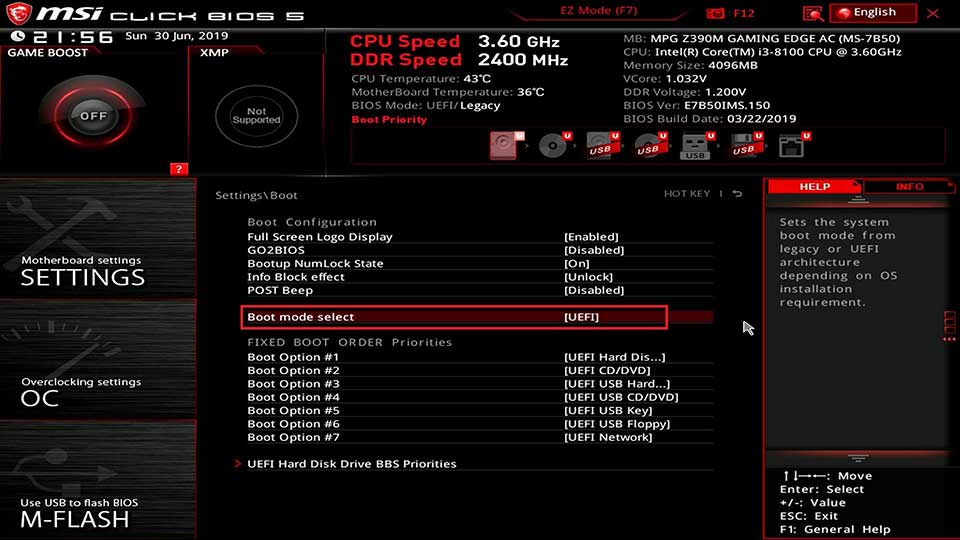
Once you get into the BIOS there will most likely be a section named Boot. From there you can change which drive the system looks at first to boot from. Here are a couple of examples of boot order screens from different legacy BIOS manufacturers.
3. Navigate the UEFI Interface
The image below shows an example of a modern UEFI boot order screen. You can typically just drag and drop the boot icons at the top of the screen to reorder them. Make sure the USB icon is sitting in the number one position.
Temporary Boot Menu vs. Permanent Boot Order
1. Use the Temporary Boot Menu
If you only need to boot from a USB drive once, look for a ‘Boot Menu’ key on the startup screen. It is often F12, F11, or F8 depending on your motherboard manufacturer. Some computers will show a message saying something like press F12 to choose boot device. If that’s the case you wont need to go into the BIOS and change the settings manually.
2. Select the One-Time Boot Device
This menu allows you to select a boot device for a single session without permanently changing your BIOS settings. This is much safer than changing the master boot order. The PC will automatically go back to booting from the internal hard drive on the next restart.
3. Save and Exit Your BIOS Changes
If you did change the master boot order, once you set it to the way you want it make sure to save before you exit. Most of the time there is a save and exit option where you can do both at once. Then the computer will reboot and read from the new boot device that you chose in the BIOS/UEFI settings. Keep in mind that this new device will continue to be the primary boot device until you go back into the BIOS/UEFI and change it back to the way it originally was.
For additional training resources, check out our online IT training courses.
Check out our extensive IT book series.