Last Updated on July 26, 2026
Unless you are the type that builds your own computers you may have no idea what type of hardware you have inside of yours. Then again you might not really care! For example, you might know you have a high-end Intel Core i9 or AMD Ryzen 9 processor, but do you know if your RAM is DDR4 or the newer DDR5? Do you know the exact “CAS Latency” or if your motherboard supports PCIe 5.0?
This level of detail is critical when you are looking to upgrade your memory or ensure your system is running at its advertised speeds. Or do you know the make and model of your motherboard or how who makes the BIOS or UEFI or how old it is when it comes to updates? This type of information can come in real handy when troubleshooting hardware problems especially when it comes to replacing faulty components.
If you make a listing of everything you have in your computer it’s much easier to try and find a replacement when something goes bad. Sure you can go online and try and get as much information from the vendors website as you can in regards to the specs but why not just run a program and have all the information you need at your fingertips?
That way you will be ready for the next hardware failure and have all the information you will need to replace any parts with the same make and model assuming you can find them based on how old your computer is. Of course you don’t always have to replace the parts with the same make and model if you can find something compatible.
Understanding the CPU-Z Tabs
CPU-Z is a free utility that you can run on your computer to get information about your hardware devices when it comes to your processor, RAM, motherboard and video card. It’s very easy to use and gives some pretty detailed information. The program consists of 8 separate tabs that each perform their own function.
1. The CPU Tab
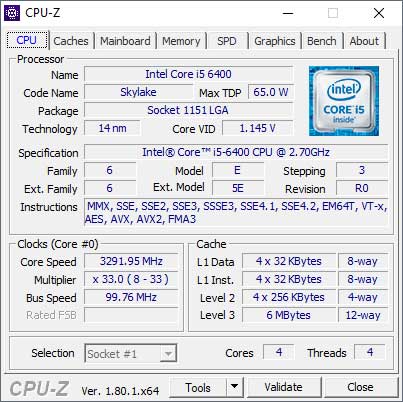
The CPU tab shows you information about the processor installed in your computer. It displays the exact make and mode, code name, socket type, core speed and cache. As you can see much of this information won’t make sense for the average user but if you are a super computer geek you might enjoy knowing all of the details.
2. The Caches Tab
The Caches tab shows information about the CPUs onboard cache. It breaks down the exact sizing for the L1, L2, and L3 memory modules. It is not super helpful for the average user but the deep technical info is there if you need it.
3. The Mainboard Tab
The Mainboard tab will show you the exact make and model of your motherboard. It also displays the chipset information, as well as details about your BIOS such as brand, version and date.
4. The Memory Tab
The Memory tab is vital for verifying that your RAM is actually running at its full potential. Many users buy high-speed RAM but forget to enable XMP (Intel) or EXPO (AMD) in the BIOS. CPU-Z will show you the “Uncore Frequency”. Remember that for DDR (Double Data Rate) memory, you usually need to double the frequency shown here to see your actual effective speed.
5. The SPD Tab
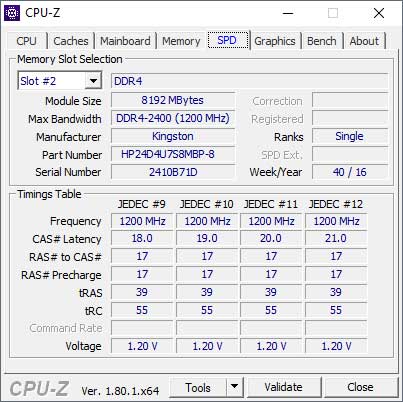
The SPD tab is a continuation of the Memory tab and shows information such as how much RAM is in which slot. It also shows exactly how many memory slots you have on your motherboard. You can also get the manufacturer details along with the part number and serial number which makes it easy to add the same type of RAM to your system for upgrades.
6. The Graphics Tab
The Graphics tab displays what video card you have installed in the system. It also shows other information such as its GPU core name, clocks and memory size. If you have onboard video it’s not as helpful compared to if you have a dedicated video card.
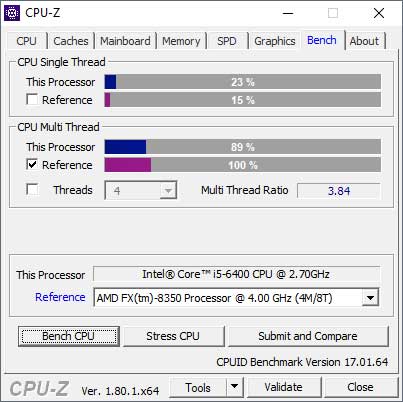
7. The Bench Tab
The Bench tab is interesting because you can run synthetic tests on your processor and compare it to other makes and models. The Bench tab is a fantastic way to check for thermal throttling. By running the built-in stress test, you can see if your CPU maintains its clock speeds or if they drop under heavy load. You can also “Reference” your score against other top-tier CPUs to see if your system is performing within the expected range for your specific model.
8. The About Tab
Finally the About tab is there to give you a little more information about your system. It has some options to save your hardware information as a text file report or as an HTML file report.
Pro Tip: Use the Validate Feature
1. Generating a Verification URL
If you’ve just built a new PC or successfully overclocked your system, use the “Validate” button on the About tab. This creates a unique URL that proves your hardware specs and speeds. This is a standard requirement if you are participating in hardware forums or seeking technical support for performance issues.
2. Pairing with HWiNFO64
For even more detailed information, many enthusiasts pair CPU-Z with HWiNFO64. While CPU-Z is best for identifying “what” is in your computer, HWiNFO64 is better for monitoring “how” it is running. It provides real-time temperatures for every single sensor in your system.
3. Using Portable Versions
Both can be run as “Portable” versions, meaning they don’t require a formal installation and won’t clutter your Windows Registry. You can download the CPU-Z utility directly from their official website. You would choose the Zip version if you want to run it without installing it.