
Last Updated on April 12, 2026
Hyper-V is a powerful, enterprise-grade hypervisor built directly into Windows. While it was originally designed for Windows Server, it is also available on desktop versions of Windows 10 and 11. Unlike third-party software that runs “on top” of the OS, Hyper-V is a Type-1 hypervisor that runs directly on the hardware, offering superior performance for testing software, running different operating systems, or setting up a secure lab environment.
Requirements and Enabling Hyper-V
Hyper-V is available on Windows 10/11 Pro, Enterprise, and Education. It is not supported on the Home edition. Additionally, your CPU must support Virtualization Technology (VT-x or AMD-V), which usually needs to be enabled in your computer’s BIOS/UEFI. There is however a workaround to enable Hyper-V on Windows desktop editions.
Method 1: The Windows GUI
- Open the Start Menu, type “Turn Windows features on or off”, and press Enter.
- Locate Hyper-V in the list.
- Ensure both Hyper-V Management Tools and Hyper-V Platform are checked.
- Click OK and Restart your computer.

Method 2: PowerShell (Fastest)
- If you prefer the command line, open PowerShell as an Administrator and run: Enable-WindowsOptionalFeature -Online -FeatureName Microsoft-Hyper-V -All
- After the process completes, type Y to reboot your system.
Running Hyper-V
Once you have the Hyper-V feature enabled then you can find the Hyper-V Manger under Windows Administrative Tools. Once the Hyper-V Manger opens it should be connected to your computer which should be shown under the Hyper-V Manger header on the top left of the window. If you right click on Hyper-V Manger you can connect to another computer running Hyper-V.
The Virtual Machines window will show you your listing of VMs that you have created. If you have just enabled Hyper-V then you won’t have any VMs listed here. Once you do create some VMs you can see their state, CPU usage, assigned memory, uptime and status from this section.
When you do create VMs and have checkpoints enabled then you can see the checkpoint status in the Checkpoints pane. Hyper-V uses checkpoints to save the state of virtual machines in case you have an issue with one and need to roll it back to a previous point in time. Checkpoints are enabled by default on VMs and are taken at set times. There are two types of checkpoints you can use for your VMs.
- Standard Checkpoints – these are used to take a snapshot of the VM and its memory state at the time the checkpoint is initiated.
- Production Checkpoints – these use the Volume Shadow Copy Service (VSS) to create a data consistent backup of the VM. It does not take a snapshot of the VM memory state.
Note: Checkpoints are useful for short-term rollbacks, but they are not a replacement for backups. Leaving checkpoints active for long periods can significantly slow down your VM and consume massive amounts of disk space as the “difference” files grow.
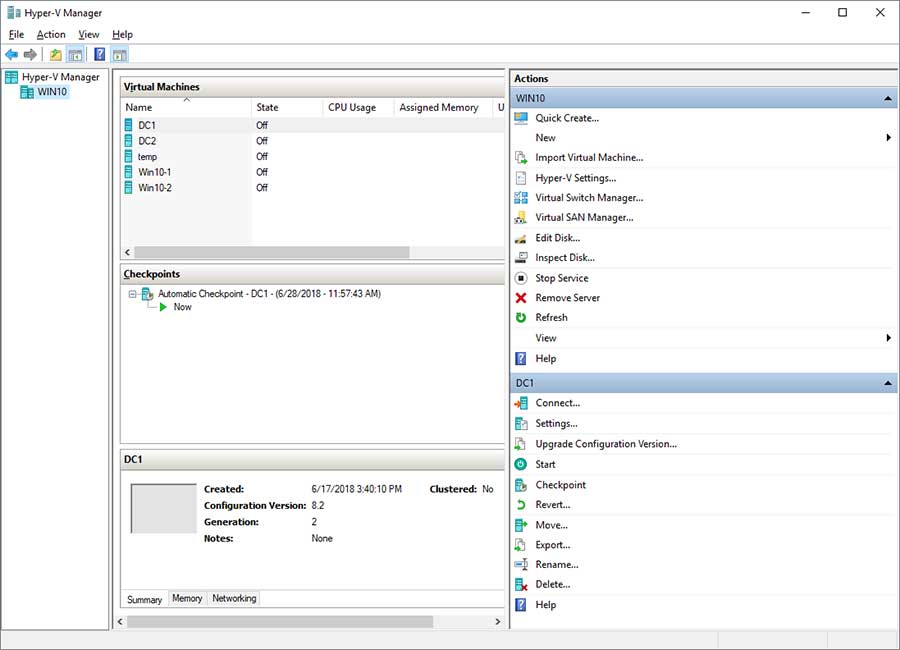
The pane below Checkpoints shows a summary of the VM that you have highlighted in the Virtual Machines section. It shows things such as its creation date, configuration version and generation version. The Memory tab will show its startup, dynamic, minimum, maximum and assigned memory information. The Networking tab shows the network adapter in use as well as its connection and IP address when the VM is powered on.
The Actions pane is where you can perform a lot of your daily tasks on existing VMs as well as your virtual networking settings. You can also create new virtual machines from this area by clicking on the Quick Create or New link. The Quick Create option just has you choose an ISO file for the operating system you are installing and it does the rest while the New option takes you through many more detailed steps to customize your new VM. You can read about how to create a Hyper-V virtual machine here.
Virtual Machine Settings
To view the settings of a particular virtual machine all you need to do is click on it to highlight it and then click on Settings in the Actions pane or you can simply right click the VM and choose Settings. There are many configuration options that you can adjust here. Let’s take a minute to discuss them.
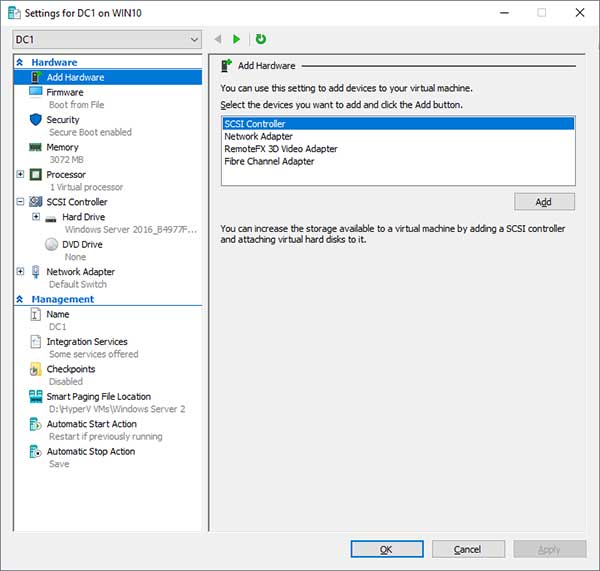
- Add Hardware – Here is where you can add additional hardware such as SCSI controllers and network adapters.
- Firmware – If you want to boot from another device such as a DVD drive or network adapter then you can switch up the boot order from this section.
- Security – This is more important than ever. For Windows 11 VMs, you must go here to enable the Trusted Platform Module (TPM) and Secure Boot, otherwise, the OS will not install or update correctly.
- Memory – Allows you to increase or decrease the amount of RAM assigned to the VM. There is also a place where you can enable Dynamic Memory and assign a minimum and maximum amount of RAM for the VM.
- Processor – Here you can add additional virtual processors to your VM and also use resource control to balance resources among VMs.
- SCSI Controller – Allows you to add hard drives and DVD drives to your SCSI controller.
- Network Adapter – Here is where you specify which virtual switch is to be used for the network adapter on the VM. You can also assign VLAN IDs and enable bandwidth management.
- Name – Allows you to change the name of the VM. Keep in mind this won’t change the hostname that the operating system uses for the VM.
- Integration Services – Here you can assign services like operating system shutdown, time synchronization and VSS backup assuming the guest operating system supports these services.
- Checkpoints – We mentioned checkpoints at the start of this article and here is where you manage them.
- Smart Paging File Location – This is where you can specify the paging file for the VM.
- Automatic Start Action – This is where you tell Hyper-V what to do with the running state of the VM when the physical computer starts such as start the VM if it was running before, start the VM every time or do nothing at all.
- Automatic Stop Action – This is where you tell Hyper-V what to do with the running state of the VM when the physical computer shuts down such as save the VM state, turn off the VM or shut down the guest operating system of the VM.
Hyper-V on the desktop provides a robust platform for both professionals and hobbyists. By mastering the Virtual Switch Manager and VM configuration settings, you gain the skills necessary to manage enterprise-level virtualization environments.
For additional training resources, check out our online IT training courses.
Check out our extensive IT book series.


